|
|
When VRMLmagic is run initially the welcome screen will come up, followed by the main working environment consisting of the menu window and the default view window, this may take a few moments but on completion you will see the default working arrangement as displayed below.
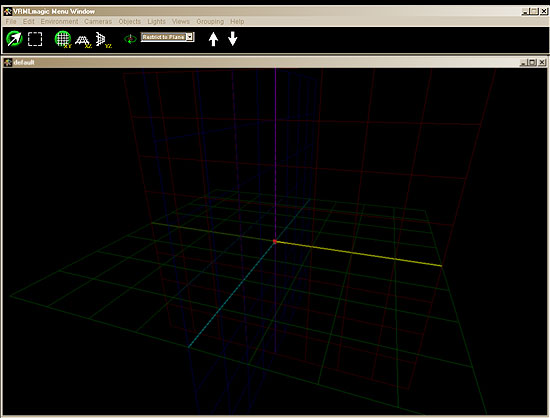
The on-screen VRMLmagic working environment consists of two key elements, the first is the main menu/toolbar, this is the main control window and through this you can set and control all of the elements of your world. The second is the set of view windows (initially there will be a single default view window, however more can be added, we will cover this later)
Take a look at the sections below for a brief rundown of each of these elements and how they work.
Below is an image of the menu bar for VRMLmagic, it consists of 2 parts, a menubar and a toolbar, the following sections describe each of these.

VRMLmagic uses the menu system to provide the functions available through the package. Generally speaking if you are looking for the place to find an action then the menubar is the place to look.
To make it easier to find the desired action(s) the menubar is divided into a series of menus, each of which handles a specific type of action:
Running from left to right across the screen the toolbar allows you to view and set the controls for how you interact with the 3D world. The green rings indicate the current tools/settings (this is also reflected in the Active Tool: information at the base of the toolbar).
Interaction Tool - ![]()
Interaction Plane - ![]()
Rotation Type -![]()
Level of Detail - ![]()
Active Tool -
The large window that takes up 90% of the screen and contains the coloured grids is the default view, this is a window showing you the point of view from the default camera. Each view window represents the view that a specific camera would see from its location in the environment. As you can create many cameras you can also have many views to show you what they will see. In the case of a complex world you may have many cameras, however that doesn't mean you must have one view for each camera. The important thing to remember is that views are simply the way you (the developer) can see what the cameras will see in the final world, you do not need to have view windows up for all of the cameras merely the ones that will help you in the construction.
The view window is the place where you can interactively position and orient the items that make up your 3D world. Sometimes the camera view (the default perspective window) isn't ideal for positioning items in the world. To help with this VRMLmagic allows you to use your view in one of two arrangements:
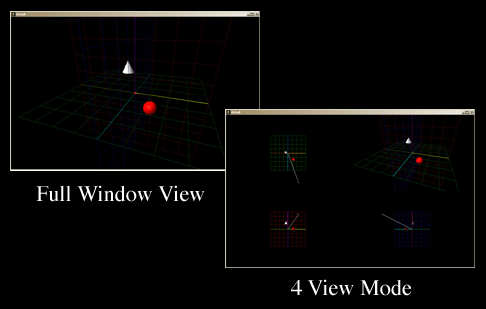
Try changing the default view windows type:
You will notice that under the menu: Views - For Current View - there are several other options you can set specifically for this view including:
To add a new view window you simply use the menu: Views - Add View. This will bring up a list of cameras from which to choose, you simply select the relevant camera and its view will be created in a new window. Note that you can have multiple views using the same camera (eg. you could have a 4 view window for camera A and also a Full view window for camera A). For this reason it is worthwhile to name your views to make them easy to distinguish.
Under the Views menu there is a list of Show "viewname" items, this list will vary depending on the number of available views (and the names of each of those views). To bring any one of the views to the front simply select menu Views - Show viewname.
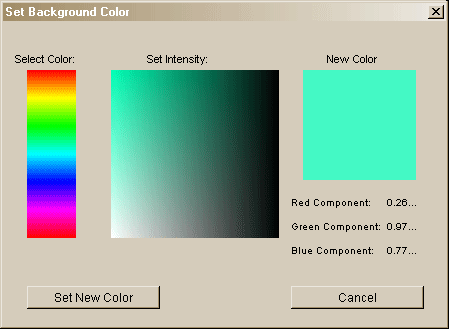
Most of the general world settings (including rendering quality, background colours etc) can be found under the Environment menu. These general attributes allow you to control both the interactive environment (ie. show/hide aids) and the worldwide settings such as background colours.
Simply use the menu: Environment - Set Background Colour to set the worlds background colour (note that this background applies to the whole world (not just one view)). This will bring up a colour selector dialog where you can choose your desired colour.
VRMLmagic provides several "Visual Aids" designed to help make development and interaction easier. Although these aids (eg. grids, centre of world marker, lights etc) are visible in the interactive environment they DO NOT exist in the final VRML output world. In many cases you may want to turn off/on any one of these aids. Below is a summary of how to achieve that:


The view windows provide both the opportunity to view the world as it will appear to the viewer and also to interact with the contents of the world, by adding and changing the items that fill the space. Aside from adding items to the space (achieved through the menu system) in the view we can position and orient the items that make it up.
The 4 View style window allows you to interact in the plane of the quadrant (eg. if you drag in the top view you will move the item in that plane (and interaction plane will automatically adjust to reflect this)). In the full window view you will need to directly use the interaction plane setting in the toolbar (eg. XY, XZ etc) to change your working plane.
The first important thing to note regarding interactively dragging (either to move or rotate items) is that you must drag the actual item not the training wheels or associated parts. For example if you have a box in the centre of the world and you click on it to select it (showing the training wheels), if you then attempt to drag the training wheels you will simply miss hitting the object and the drag will not work. So if you want to drag an item click on the actual item itself only.
By simply selecting the Pointer Tool and dragging (with the left mouse button for multi-button mice) objects/lights in the view window we can move their position on the current interaction plane. To move in another plane simply click on the relevant plane in the toolbar.
Depending on the operating system you are using dragging items can be switched into rotating mode (to change orientation instead of position). This occurs on one button systems only (such as the Mac). In the one button case you will need to check that the button interaction type is set to movement rather than rotation.
Depending on the operating system you are using dragging items can be switched into rotating mode (to change orientation instead of position). This occurs on one button system only (such as the Mac). In the one button case you will need to check that the button interaction type is set to rotation rather than movement in order to orient your item. In a two button system rotation is associated with the right mouse button so you can simply drag using the right button to reorient your object/light. You can also set the rotation style to one of:
Using the techniques outlined above try to arrange your world to have:
When VRMLmagic is run (without a world) it creates an initial default world for you to work with. This world has the following attributes:
This is a default arrangment to get you started, these settings can and should be altered as outlined in the above sections.