|
|
This section covers how to add objects (physical structural items) of differing kinds to your 3D world and how to change their attributes (such as colours / materials / textures / sounds / interactions...), to suit your particular needs. For information on how to move and orient these objects in your world see the previous section. An important point to note is that all objects are geometry based and cannot have their geometric shape altered after construction (they can be resized/reoriented and positioned but they cannot have their structure altered). As an example you can add a terrain object to the world and by simply resizing it (so that its height is sized up) you can make all of the bumps bigger as required, however you cannot individually select one bump and enlarge it relative to the others (this principle is true for all object types).
To add an object to the world simply use the menu Objects - Add Object. This menu will bring up a dialog (see image below) to let you choose the type of object you wish to add.
Simply choose the type by clicking on the graphic (this will highlight the type by moving the green ring over it) and select 'Add It' to add the object to your world. All objects will be added with a default (plain white) material and at a size of 1x1x1. They will initially appear in the centre of the world (ie. the location indicated by the centre of world marker), if your view is not able to see the centre of the world, you can use the menu Views - For Current View - Revert to View Worlds Centre to see the object.
The Add Object dialog offers a range of types of objects to add to the world, the following sections detail each type and how to use them.
These objects are simple generic geometrically based shapes including:
These objects are more complex and include objects such as Terrains (a randomly generated bumpy plane), 3D Text, 3D Extrusions (an extrusion of a 2D image) and Files (objects stored in file formats such as VRML and .obj). Generally they require you to specify more information to generate, the details for each type are outlined below.
A terrain is a randomly generated bumpy surface (its ideal for generating an uneven appearing ground plane). You can control the size and number of bumps using the terrain dialog (as shown below). This dialog is brought up when you select 'Add It" from the main Add Object dialog.
| In this dialog you can specify the size of the terrain (as a reference primitive objects extend by 1 in each axis). You can also specify the bumpiness and bump size for the terrain. Where bumpiness is the number of bumps across the surface and Bump Size is the size of the bumps.
For example a single mountain would have low Bumpiness but high Bump Size, where an ocean with many small waves would have a high Bumpiness but a low bump size. When you have the settings ready clicking Build It will create the terrain for you. As each terrain is generated randomly, if you don't like the one you get you can simply delete it and try building a new one. |
 |
A 3D Text object is an extruded (pushed back to give it depth) version of a 2D text item. In VRMLmagic a text item is the group of text as initially created. This means that if you create the words "Hello World" as a single 3D text object then those words/characters will always move and act as a group (ie. you cannot after the fact single out an individual letter or alter the textual content). For example if you want to treat "Hello" and "World" as different items (eg have different materials/location/interaction etc) then you need to create two separate 3D text objects (one for each word).
When you choose the 3D text object type in the Add Object dialog you will get the 3D Text dialog to enable you to specify the text you wish to create. This dialog allows you to set the font (available fonts depend on the fonts that are in your system) and style for your text. Note that the text area itself will display the characters as they will be extruded, so all you need to do is select your font and then type in the text and click OK.
The 3DText dialog is as follows (on the upper left of image below), the resulting object (as seen in the view window after being added) generated by selecting OK for the dialog is also displayed.
Much like the 3D Text object described above with the exception that instead of taking a piece of 2D text and giving it depth this object takes a 2D image and creates a 3D version of that image. This is ideal for creating a 3D version of company logos/symbols etc.
When you choose an Extrusion object from the "Add Object" dialog you will be presented with the Extrusion dialog as follows:

In this dialog you can specify the image to extrude by clicking the "Load Image to Extrude..." button. This will in turn bring up a file selector for you to choose the image file for extrusion. having selected your image it will be displayed in the "Image to Extrude" section, you can then click the "Build from Image" button to create the object. Note that this may take some time (more time for more complex shapes and images). If after a period of time it returns a failure (eg. unable to build object), you may need to simplify the image by making it black and white and/or sharpening the edges (ie. making it aliased).
As the extrusion tool essentially scans the image and attempts to locate the edges between black and white it is best to have a black and white image without any anti-aliasing (this softens/greys the edges thus making them more difficult to identify). To work effectively the type of image you extrude needs to follow these guidelines:
VRMLmagic provides simple modelling and object construction features, however to obtain highly complex objects we recommend you either use one of the more powerful modelling tools as they are designed with object construction in mind and are most suited to the task. Or aside from constructing objects yourself there are libraries of existing objects from which you can obtain objects. These object files allow you to access objects made in other packages (often modelling packages) by loading files containing the stored object data. Often such files are an excellent way of obtaining complex objects that would be difficult to build yourself.
Unfortunately there are many object file formats in existence and VRMLmagic does not support loading of all formats (VRMLmagic supports VRML (.wrl) and .obj files). However in most cases you will be able to find a converter that will enable you to convert between formats and thus enable you to load the object into VRMLmagic. There are many sources for such objects/convertors and you might want to look at our Tips & Tricks - Finding Objects page for more information.
When you have an object in either VRML or .obj formats you can load it into your world by choosing the "Load File..." item in the "Add Object" dialog, this will bring up a file selector in which you can locate and select the desired file. VRMLmagic will then load this file and add it to the world as an object. The fact that it is added "as an object" is important in that if you load another VRML world which contains, viewpoints/lights/etc. that peripheral (non-object) information will NOT come with the object. Loading an object file simply loads the geometric object described in the file (in all cases it attempts to load as much object information (materials/surfaces/etc) as it can, however as a general rule it is best to expect nothing more than the geometric object data.
An objects position and orientation in the 3D world can be interactively set by dragging the object in the view windows, for more detail on this go to Interacting in the View Windows.
Setting the size of an object is achieved through the menu item Objects - Resize Object.... You must first select the Object whose size you wish to edit (by clicking on it in the view window) then by selecting the menu Objects - Resize Object... you can adjust the size of the selected object via the resizing dialog (see below).
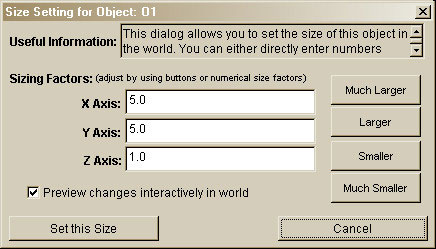
This dialog allows you to either directly set the scaling factor in the numeric fields (eg. to double the size in the X axis simply double the X axis number in above to 10), or you can use the Larger/Smaller options to steadily enlarge or reduce (evenly in all axies) your object. Note that sizing does not need to be undertaken evenly in all axies, you can make items wider by increasing the X axis without needing to change the other axies.
The preview changes checkbox indicates if you wish to interactively see the changes that this sizing would cause (as you enlarge/reduce so does the actual object in the view, however this new size is only a preview), if you choose to Cancel the whole dialog the original size of the object will be restored, if you choose Set this Size then the new size will be set.
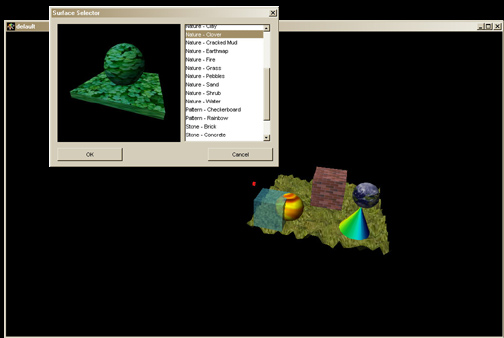
Each object has a surface associated with it. By default objects start with a plain white surface, however that surface can be changed using the object attributes dialog. To achieve this you can either double-click on the object in the world or you can click on the object (select it) and then use the menu Objects - Edit Attributes..., this will bring up the following:
This dialog allows you to set all of the attributes that define an objects surface (it also allows setting of interaction and sound attributes which will be covered later). An easy way of changing an objects surface is to use the available Predefined Surfaces... (simply click the button in the upper right to see the available set), these surfaces offer a range of preset options which may suit your needs or may make a good place to start (ie. select the closest and make some alterations to get desired result). Below are some example preset surfaces:
Whether you are using a preset or making your own surface, every surface is made up of a collection of attributes (each of which can be individually adjusted) including:
|
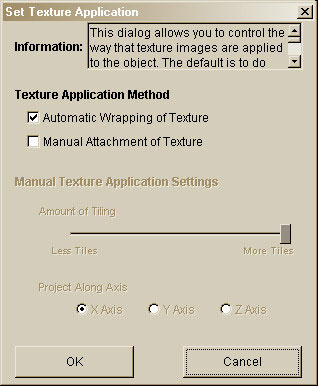
Texture application attributes enable you to control the way your texture image is attached to the object. You can either allow the automatic wrapping method (default) or you can manually set the amount of tiling to use. This is useful in cases where you wish to map many copies of a small repeating texture (eg. grass onto a large terrain). The axis of application indicates how the tiles will be applied (eg. for a terrain you want to apply the tiles down from above so they would be projected along the Y Axis. |
 |
VRMLmagic allows you to attach sounds to objects, to achieve this you simply need to use the Object Attributes dialog (get this up by selecting the object and using the menu Objects - Edit Attributes...). In the bottom right hand corner of this dialog is the sound section. To attach a sound to the object simply click on the "Click to attach sound to this Object" checkbox, this will bring up a file selector to enable you to choose the sound file to use. Note that various sound formats are supported by VRML (ie. it allows for many/any format to be used), for that reason VRMLmagic does not insist on any particular format, however browsers are only required by the VRML standard to support WAVE files (.wav) in PCM format. In general some other formats will work but if you want to be sure of the sound working on compliant VRML browsers then use WAVE files.
When you have selected your sound file you can use the Play button to test how it will sound. VRMLmagic will play back sounds of a range of formats (this range is usually larger than that supported by browsers), so the fact that VRMLmagic can play back your sound does not guarantee it will work in a browser.
You can also control some of the attributes of how the sound will function in the 3D world, including either turning on or off the looping capacity (simply check on/off the looping box), and you can change the range over which the sound is audible by entering a range value in the field provided.
A final note relating to sound is that the sound will NOT work in VRMLmagics view windows, it will only work in the final world when viewed in a browser. So in order to test if your sound is working you need to save and preview your world in one of the browsers.
Objects and lights can be organized in multiple levels of detail. A good example of this is a model of a car, at the highest level you can move a car and all of its parts move as a unit (ie. the "car" is the top level group). However a car is made up of a series of sub-parts (eg. chasis, wheels, etc), each of those sub-parts can be an object of its own. This type of multi-level-of-detail object is relatively common (especially in complex objects). VRMLmagic allows you to move up/down through the levels of detail by providing the "Up Level of Detail" and "Down Level of Detail" buttons on the toolbar.
As an example imagine you load a "car" object and move it into a position/set its colour to red. Then you decide you want to make the tyres black so you click the Down Level of Detail (down arrow in toolbar) and try clicking on the tyres. Depending on the object you may need to go down more than one level (if the object itself does not have sub-structure then you will not be able to sub-divide it). However in most cases you will be able to go down one/two levels and select just the tyres, from there you can set their surface as you would any other object. Remember that after moving down levels of detail it is always a good idea to return back to the top level.
To create "groups" of objects/lights that can be treated as a single unit you can use the functions available under the Grouping menu. For example try adding three boxes to the world, then select them all and group them using the menu Grouping - Permanently Group Selected Objects. Now when you select any one of them the group is selected and can be manipulated as a unit. Each of the original boxes still exist as sub-objects and can be accessed by using the "Down Level of Detail" tools, see Multi Level Objects above.
To ungroup a set of objects, firstly select the items you wish to ungroup then use the menu Grouping - Ungroup Selected.