|
|
This section covers how to add cameras (eyes that view the world from a fixed position) and how to change their attributes (such as focal point, location, ...) to suit your particular needs. As is the case for lights an important point to note is that cameras do not have any physical substance to them, to enable you to manipulate them in 3D space VRMLmagic uses graphical representations to show where the cameras are in the space (these graphics are merely aids that can be turned off (use menu Cameras - Show/Hide Cameras) and DO NOT appear in the final world). VRMLmagic uses graphical representations of eyeballs (camera location) and red targets (focal point) to represent cameras in the view windows. These items will be discussed in more detail in the following section.
Every VRMLmagic camera that exists in a given world will produce a fixed viewing location for the final VRML world that you output. Hence if you want to allow your user to "walk-through" your environment by stepping from fixed location to fixed location then you need to have a camera at each of these locations.
Views on the other hand are simply a window to help you with development (ie. they allow you to see what a camera would see while you are developing).
Eyeballs are the graphical representation of a camera in the view windows. They consist of several key parts and look as follows:
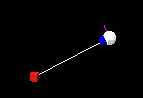
The key elements are:
NOTE: you will notice that in the default views setup you can clearly see the default cameras focal point but you cannot see the eyeball or the line of sight. This is because camera views do NOT show their own eyeball or line of sight. You can however see it by going into 4 View mode where it is visible in the top/front/side views.
To add a camera you simply use the menu Cameras - Add Camera... . This will add a default camera (if you cannot see it you may need to Show cameras using menu Cameras - Show/Hide Cameras, & in some cases where you have moved the default camera you may need to look at the centre of the world. However if you go into 4 view mode you will see all of the cameras in the top/ front/ side views). When you choose Add Camera from the menu you will be asked to give the camera a name before it is created. Where possible it is best to try to use unique names for your cameras, although VRML supports multiple cameras with the same name, it is confusing both for you and users of your final world.
Cameras are relatively simple items, however by adjusting their attributes we can easily make enormous changes to your world. In general it is a good idea to leave the default camera in place and add/manipulate new cameras as you need them. This way you have a single base view (the default cam) of your world and within that you can adjust your other cameras. A good tip with regards to adjusting cameras, particularly camera positions and focal points is to NOT adjust the focal point of the "active" camera as this can be confusing. Instead try creating a new view using the desired camera then manipulate it (the camera) in the default view this way you see the view altering in the new view but you can also see the old state of the world in the default view.
To position both the cameras eyeball and its focal point you can simply move them in 3D space as is the case for other items in the 3D views, for more detail see Interacting in the World.
The most effective way to get a camera looking at what you want it to look at is to:
Aside from position and focal point there are a few other attributes that you can set. To do this select the camera and use the menu Cameras - Edit Camera Attributes... . This will bring up the following dialog.
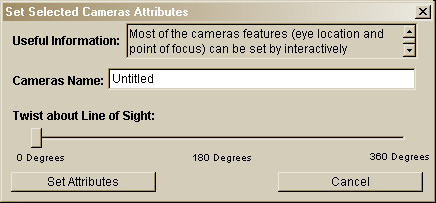
This dialog allows you to set the following attributes for this camera:
Finally click "Set Attributes" to apply these new attributes to the camera.