|
|
This section covers how to add lights (sources of light without physical substance) of differing kinds to your 3D world and how to change their attributes (such as colours / directions / strengths...), to suit your particular needs. For information on how to move and orient these lights in your world see the previous section. An important point to note is that all lights do not have any physical substance to them, to enable you to manipulate them in 3D space VRMLmagic uses graphical representations to show where the lights are in the space (these graphics are merely aids that can be turned off (use menu Lights - Show/Hide Lights) and DO NOT appear in the final world).
Lights are a powerful way of changing an environment, and come in several different types, as a general rule all light related actions can be found under the Lights menu. The following sections describe more detail of the lighting system in VRMLmagic.
To add a light to the world simply use the menu Lights - Add Light. This menu will bring up a dialog (see image below) to let you choose the type of light you wish to add.
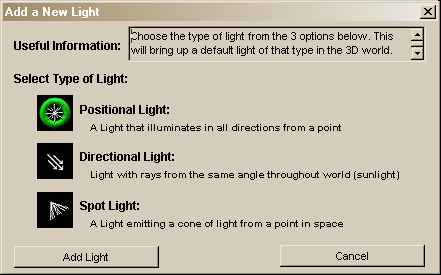
Simply choose the type by clicking on the graphic (this will highlight the type by moving the green ring over it) and select 'Add Light' to add the light to your world. All lights will be added with a default (plain white) color and brightness. They will initially appear directly above the centre of the world (ie. the location indicated by the centre of world marker), if your view is not able to see the centre of the world, you can use the menu Views - For Current View - Revert to View Worlds Centre to see the light.
The Add Light dialog offers a range of types of lights to add to the world, the following sections detail each type and how to use them.
A positional light is a point light source (somewhat like a candle or a globe) it emits light in all directions from a source point. When added to the world positional lights are represented by a small star (see star inside green ring above) in the lights color. By default point lights have a white color and appear directly above the centre of the world. You can set their attributes (ie. color, strength, on/off, ...) by double clicking on the star or by selecting the star (click) and using the menu Lights - Edit Light Attributes... for more detail on setting a positional lights attributes see Setting Positional Light Attributes below.
A directional light is a distant light which, somewhat like the sun casts rays of light that are parallel, such that every item in the world is hit by these light rays at the same angle. These lights are not represented in the 3D world itself (as they are not coming from any single point), so when adding a directional light to the world you need to specify some additional information. When you choose a directional light in the "Add Light" dialog you will be presented with the "Create a Directional Light" dialog (see below) to allow you to specify this additional information.
Specifying the direction you want your Directional Light to point is one of the more difficult tasks and requires you to specify two key values:
At the base of the dialog are some pre-set directions (up / down / in / out etc), try clicking these to see the angles they generate as this may aid you in working out what direction values you will need. |
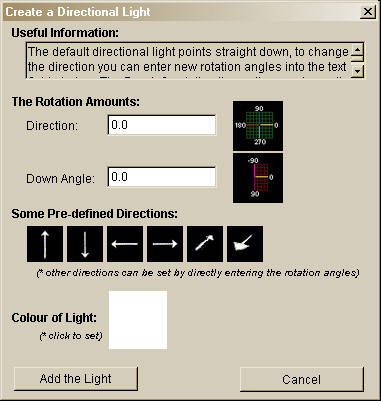 |
When you have set you direction and down angle values you can click Add the Light and the directional light will be added to the world. Note that you will not see any physical item in the 3D world to represent it (the only way you can tell it is there is by its lighting effect on objects in the space). If you find that the light isn't working as you desired (eg. wrong colour / direction etc), you can edit its attributes, see the section Setting Directional Light Attributes for more details.
A spot light is a directed beam of light contained within a cone, such that it casts light only onto items falling in the path of the beam. When you choose a Spotlight in the Add Light dialog a default (white, pointing straight down at centre of world) spotlight will be added just above the centre of the world. This light is represented in the 3D world by the graphic as seen above (ie. it is a colored cone of beams emitting from a central point). This item can be manipulated (ie. moved, rotated as for other items in the world, see Interacting in World), to change its position and the direction it casts its light. To set other attributes (color, cone angle, focus, ...) for a spot light see Setting Spot Light Attributes below.
The attributes that apply to light vary depending on the type of light, for that reason we will look at setting attributes for each type of light separately.
Positional lights are relatively simple and only have a few attributes that can be set. The most obvious attribute of a positional light is its position, this can be set by interactively moving the light in the 3D view, for more detail on this see Interacting in World. To set the attributes (aside from the location / position) of a positional light either double click on it (ie. its star in 3D view) or select it and use the menu Light - Edit Light Attributes... . This brings up the following dialog
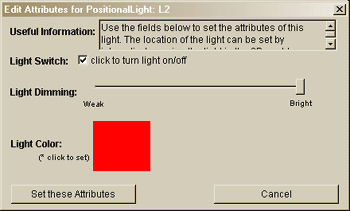
This dialog allows you to set the following values:
Directional lights have a set of attributes (primarily direction setting), that can be edited. However as they are not represented in the 3D world itself you cannot simply select them and say Edit. For that reason there is a special menu Lights - Edit Directional Lights... item to enable you to select and edit your directional lights. When you select the Edit Directional Lights menu you will see the light chooser dialog as shown below:

This dialog allows you to step through your set of directional lights (by using the Next Light / Previous Light buttons) to locate the desired one. You can then either edit or remove this light by clicking the relevant button. When you select edit you will get the Edit dialog as shown below.
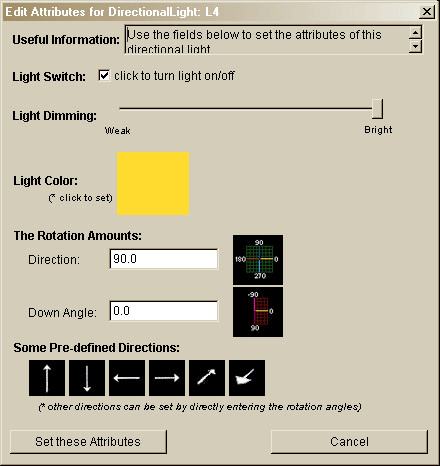
This dialog will look familiar as it is almost identical to the Add Direction Light dialog, and enables you to set the same attributes including:
When you have the attributes you desire simply click "Set these Attributes" to apply them to the world. As this is a directional light you will not see anything in the world except its secondary effects (ie. new col/direction of cast light) on other objects in the world.
Spot lights are probably the most complex type of lights in that they have a range of attributes that can be set. These attributes can be broken into two sections as outlined below.
Spot lights have a position in space (this is the source of the light) which can be set by interactively dragging the spot light (in the form of the graphic representing it) around in the 3D space. This same dragging principle can be used to rotate the direction that the spot light faces (this is indicated on the graphic by the direction in which the cone faces). This interactive setting is based on the same style as that used for all items in the 3D view and is described more fully in the Interacting in World section.
Aside from position and direction a spot light has many other attributes, in order to set these attributes you need to either double-click on the spot-light in the view window or select it and use the menu Lights - Edit Light Attributes... . This will bring up the Spot Light Editor Dialog as shown below. This dialog allows you to set:
|
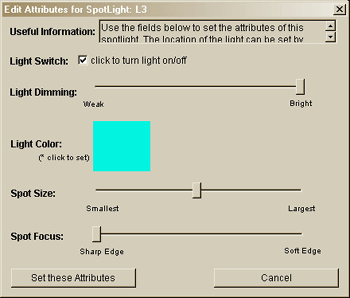 |
When you have the attributes as you desire click "Set these Attributes" to apply the new settings to this spotlight. Note you will only see changes in colour reflected in the spotlight graphic, however you should see the secondary effect (ie. light as cast onto items) of the other light settings.