|
 User Manual User Manual |
|
Examples
This section provides a set of example worlds (including step-by-step guides showing you how to create them). By building these worlds you will get a feel for using all of VRMLmagics tools and at the end you'll have some generic worlds from which you can build your own more specific versions.
Interactive 3D Heading & Navigation Bar
In this example we will make an interactive navigation-bar/heading for a company. This is a very practical example and creates a specific solution for this commercial task. The second example is a more creative project to allow you to more freely play with the features of VRMLmagic.
To get the most out of these examples it is recommended that you complete each step in turn, this will give you exposure to a range of VRMLmagic tools. Although you can choose to skip some steps or insert your own steps to personalize the result. Be careful in taking this approach as the final result may be quite different to the examples intention.
To start off lets get a clean setup for saving and transferring our new world.
Preparing for a World
Begin by following the steps below. Although it is not critical to create a new folder/directory for each new world, it makes working with the world much simpler. So lets get started.
- Make a new folder/directory for this world (eg. call it HeadingNavbar) - use the Operating Systems desktop environment to achieve this.
- Start the VRMLmagic Application
- Save the initial default world in the new directory (HeadingNavbar) as HeadingNavbar.wrl - use menu File - Save As...
- Now we're ready to begin building it
Create the Heading
We'll make a simple extruded text and logo heading.
- Add a new 3D Text Object - use menu Objects - Add Object
- Choose the 3D Text Object type & Click OK
- In the 3D Text dialog enter the Text for the Company Name (eg. VRMLmagic)
- Choose the font & style (eg. Bold/Italic Times)
- Click OK
| Shown right are: the dialog to create the 3D text object and then the result of OKing this dialog (ie. the object in the world). |
|
- Add the Logo (eg. in our example load the Scintillating Graphics logo object, however in many other cases you'll want to build an extrusion object (3D version of a 2D symbol) (ie. add extrusion object from 2D image, see section below for how to do this))
- To load the Scintillating Graphics logo use menu Object - Add Object and select the Load file option. Then simply find the object (two versions exist in directory VRMLmagic/Objects/. , a simple low polygon count version in ScintGraphicsLogoSmall.obj (recommended) and a very high polygon one in ScintGraphicsLogoBig.wrl) file and load it.
- Resize the Logo Object (ie. select object and use menu Objects - Resize Object)
- Position it at right of Text
- Switch view into 4 View mode (to allow accurate top/front positioning)
- Use interactive dragging in top & front views to position accurately on right of text
- Rotate it (you will notice that the logo is sitting squarely upright), use the interactive dragging system to rotate (right button on two button mice or set action on one button) it so that the join point is facing a little forward.
- Save the world (ie. menu File - Save)
- Preview in browser(s) (ie. use menu File - Preview in "webrowsername")
- Set the Surface of the Text
- Select the text object (click on it in view)
- Bring up setting dialog (use menu Objects - Edit Attributes...)
- Choose either a Predefined Surface (water isn't bad for this) or make a shiny, partially transparent Aqua surface
- Set the Surface (OK the dialog)
- Set the Surface of the logo (use a pre-defined like Gold or make a shiny, solid yellowish surface)
- Make Items into a Group
- Select both the Heading and the Logo (click on one and shift-click the other or use Region select tool)
- Group Them: use menu Grouping - Permanently Group Selected Objects
- Test It (ie. select one of them and you will get the pair as a unit, you can now move / rotate this pair like a single object)
- Save the world (try using File - Save (will save over oldname))
- Preview in webbrowsers(s)
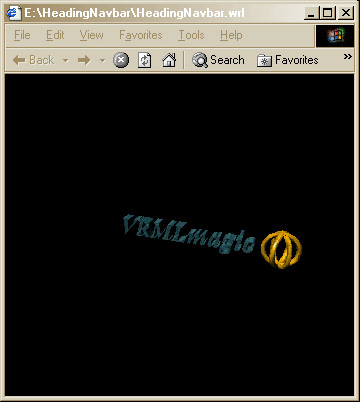
| You have now completed a 3D heading, the image on the right shows how the VRMLmagic example (with the logo sitting upright) looks in a webbrowser (eg. Internet Explorer). |
 |
Create the NavigationBar
For our particular example we will create a single world that includes both the heading (as constructed above) and the Navigation bar. However if you would like to use them independantly you can simply create a new/separate world for the Navbar we are about to create.
- If not already open, open the world with the heading (ie. HeadingNavbar): use menu File - Open World
- Switch into 4 View Mode (use menu Views - For Current View - Display 4 View Window)
- Move the Heading out of the way
- Select the Heading/Logo group and drag it away from the centre of the world (eg. perhaps dragging it back on the green plane is the best place)
- This will provide some working space for you to build the Navigation bar items.
- Now lets Build some icons for our NavBar
- In our example we'll build a Navigation bar with icons/links to the following:
- Information
- Search
- Home
- Help
- Products
- About Us
- For each of these Icons we could simply use 3D text extruded (eg. as we did in the heading) for the Words, however to explore the possibilities lets make some graphical representations instead.
- Information Icon - we'll build an extrusion object to represent this, as follows:
- Add an Extrusion Object - use menu Objects - Add Object and select the Extrusion object type
- In the "Extruded Object Builder" dialog click the "Load Image to Extrude" button
- Select the file VRMLmagic/ExtrusionImages/Info.gif
- Click the "Build from Image" button to create the object
- You will need to resize it (select and use menu Objects - Resize Object...) to be small (try making the icons around two thirds the size of the Logo in the heading, this is a personal choice)
- Now set its surface (this is a personal choice simply use the select - use menu Objects Edit Attributes... technique to choose/set your surface (eg. in our case we'll use a pale blue/shiny surface)
- Once you have it looking right move it to the right of the working area (to make space for next item)
- Save the World
- Home Icon - we'll build a simple "house" structure out of primitives for this:
- Add a Box Object (use menu Objects - Add Object)
- Move it Down (interactively drag on the XY (red) plane to move it down just a little)
- Add a Pyramid Object (use menu Objects - Add Object)
- Move the Box up to touch (top of box touches base of pyramid) the base of the Pyramid
- Resize the Pyramid to overhang the edges
- use menu Objects - Resize Object and enlarge in X (width - make it 1.4 times) and Z (depth - make it 1.2 times) but not height.
- When it looks like a small house go on
- Set the Pyramids (roof) surface
- Select the Pyramid
- Use menu Objects Edit Attributes... and select a dark surface (try Bark)
- Set the Box (walls) surface (see above but set to Concrete or some other lightish surface)
- Group the objects
- Select both objects (click & shift click or region selector)
- Use menu Grouping - Permanently Group Selected Objects
- Now select the "house" group object (you may need to go up a level of detail if you find you are selecting only the roof or base)
- Resize the house to be the same/similar size to the Info icon created above (ie. size to around 0.7 of its default size in all axies)
- Once you have it looking right move it to the right of the working area (ie. next to the info icon to make space for next item)
- Save the World
- Search Icon - use an extruded object for this (see Info Icon above for technique) but instead of extruding the info image use the image below and set a different surface (perhaps a metallic one):
- VRMLmagic/ExtrusionImages/MagnifyingGlass.gif
- Help Icon - use a simple 3D text of a "?" for this
- Add a new 3D text Object (Objects - Add Object) and use the character ?
- Resize it to match other icons
- Set its surface to be bright red
- Save the World
- About Us Icon - we'll use an extruded map with an additional primitive to make this icon:
- Make an Extruded Object from the file VRMLmagic/ExtrusionImages/Oceania.gif (note that VRMLmagic includes various world regions so you can use your region if you so desire)
- Move it aside temporarily
- Add a Sphere Object
- Now Place the sphere on the extruded object based on the location of your company geographically. This will take some fine detail work and you may want to enlarge / reduce either or both of the items to aid this task.
- Now select the sphere and set its surface to be red
- Now select the extruded map and set its surface to be bright green.
- When you have the sphere placed and the surfaces set now group them
- Select both the sphere and the extrusion
- Group using menu Grouping - Permanently Group Selected Items
- Resize the grouped item to match the other icons
- Once you have it looking right move it to the left of the working area (ie. to make space for next item)
- Save the World
- Products Icon - for this we will load some pre-built objects and put them together.
- Add a new Object from File (Objects - Add Object), use the file VRMLmagic/Objects/BoxOpenTop.obj
- When you add it, it will ask if you wish to smooth the edges (as this is a hard edged item switch smoothing OFF before adding it).
- Resize it to be a low box (X:1.5, Y:0.5, Z:1.5)
- Give it a brown cardboard type surface (set colour to brown and shininess to matte)
- Move it aside temporarily
- Add a new Object from File, use any of the files in VRMLmagic/Objects or its sub directory FromWWW (for our example we'll use the Teapot.obj).
- In the case of the teapot you want to have smoothing on, so when requested set this.
- Resize Teapot so it will fit in the box
- Rotate Teapot so it's spout is facing a corner
- Give it a new surface (for example we're using a purple shiny one)
- Group the objects
- Select both the box and the teapot (or other items you have added)
- Group using menu Grouping - Permanently Group Selected Items
- Resize the grouped item to match the other icons
- Once you have it looking right move it to the left of the working area (ie. to make space for next item)
- Save the World
- Now we have the physical items for our Navigation bar lets lay it out spatially
- There are several options for laying things out (eg we could use the auto distributing features of VRMLmagic to simply select all of the icons and use the menu Edit - Align Selected Items (Across etc) to line them up and then use the menu Edit - Evenly Space Selected Items to evenly space them on the line (note you don't need to Align them first).
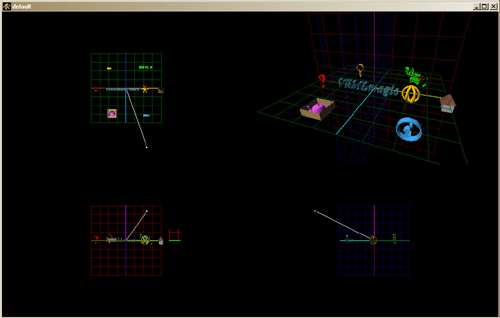
- For our example however we'll arrange them in a circular pattern (as seen from above (ie. the green plane)) around our heading (see diagram below):
To achieve this try:
- Firstly ensure you're in 4 View mode
- Now working in the Top View (where the green plane is visible)
- Move all of the icons forward/down on the green plane
- Move the Heading to the centre of the world
- Select all of the icons
- You can make sure they're at the same height by using menu Edit - Align Selected Items Heights (but its not critical as sometimes you don't want them exactly alike)
- Now position an icon on either side of heading (with a little space)
- Now position the first front icon by bringing it directly forward in front of the heading (by the slightly less than the amount that the side ones are away from centre) then shift it to the right as necessary to position it.
- Repeat this technique to place the other three front/back icons
- Now our layout should look like the image above
- At this point you may wish to resize or finely tune the positions of some of the items
- Make a group of All Icons
- Make sure you are at the highest level of Detail (click the Up Level of Detail button a couple of times to check)
- Select all icons (use SHIFT-click)
- Group using menu Grouping - Permanently Group Selected Objects
- Now test it by selecting any icon (you should get the whole group, if not try going up a level of detail and if still not try the grouping action again).
- We have now finished the basic layout for the Navigation bar, now its time to add some interactivity to it.
Bring them to Life
For this example we'll use a simple technique to rotate the icons around the heading. The we'll add some simple actions for each icon.
- Select the Icon set (ie. when you click on any icon you get all icons selected), you may need to go UP several levels of detail to get this selection.
- With the icon set selected use the menu Objects - Edit Attributes...
- These are the attributes for the SET of ICONS
- Note the Object ID (in the title bar of the Edit dialog eg. "Object Attributes for Object: O3" in this case the ID is O3, you must always include the O as well as the number)
- Close the dialog (eg. Cancel)
- At this point we could add a "rotation device" eg. like an arrow that the user can move over to spin the icons, for those who feel comfortable with object construction try making one of these and locating it below and in front of the heading. A good method is to use a cylinder and a cone to make a 3D arrow.
- For those who don't wish to make a rotation device you can simply use the heading itself.
- Select the object you wish to use as the rotation starter (ie. this is the object that when the user moves over it the icons will spin)
- Edit its attributes (ie. use menu Objects - Edit Attributes...)
- In the dialog click on the Touch button in the lower left (Interactions) region
- We will now add a touch based interaction to our object
- You will see the Touch Event Handlers dialog
- Go to the Pointer IsOver tab
- From the Pre-Defined Actions drop-menu select an action to take (in this case use Linked Object - Spin on Y Axis as this will rotate our icons around the heading)
- Put the ID for the Icons set (obtained earlier) in the "Linked Objects ID" text field at the bottom
- This will tell the action which object to spin
- OK the dialog
- Apply the attributes in the next dialog
- Save the World
- Preview the World (you will be able to move over the rotate sensitive object and make the icons spin)
- Now lets set some actions for each individual icon
- Do the following for each icon (selecting a different action/target as desired):
- Select the Icon (not the set just this icon you will need to go DOWN several levels of detail for this)
- Bring up its attributes dialog
- Select the touch action
- Go to the Touch (Click) tab
- Choose the Pre-Defined Action "Go to URL" (and set the target URL see set below for URLs for this example):
- Home Icon - http://www.scintillatinggraphics.com.au/vrmlmagic/
- Info Icon - http://www.scintillatinggraphics.com.au/vrmlmagic/
- About Us Icon - http://www.scintillatinggraphics.com.au/AboutUs.html
- Products Icon - http://www.scintillatinggraphics.com.au/Products.html
- Search Icon - http://www.scintillatinggraphics.com.au/Search.html
- Help Icon - http://www.scintillatinggraphics.com.au/vrmlmagic/Help.html
- Go to the Pointer IsOver tab
- Choose a Pre-Defined action (choose any of the actions on this object (ie. not linked objects/lights) , you can use the same action for all icons or try a range depending on wjhat you desire (note that for IsOver it is often best to choose a looping action)
- When you have finished setting the actions for all icons Save the World
- Preview it
- You will probably want to go back and change some of the actions
- When you have the actions all as you desire save the World
- Now lets make the Heading Logo Spin (all of the time)
- Select the heading logo (try to select heading and if you get both text and logo go DOWN levels of detail until you get just the logo)
- Now bring up its attributes dialog
- Click the Visibility Button (in the Interaction section)
- Now select the Pre-Defined action "Spin (+ve) on Y Axis"
- OK it and the attribs dialog
- Save World and Preview it.
You have now completed this example and have an interactive Haeding and Navigation Bar.
In this example we have created some objects and given them some simple actions, however as you can see from the actions available etc. we could do many other things. In particular we didn't focus on multiple cameras or lights (the next example briefly touches on these). Hopefully this example has given you a feel for the basic working of the package and you can experiment with the other features in your own projects.
An Interactive Environment
The previous world used the default lighting and camera arrangements and in that particular task that is appropriate. However in this example we'll create an interactive multi-camera, multi-light and sound inclusive environment.
- Firstly lets start a new World
- Create a directory for this world
- Run VRMLmagic (or start New World menu File - New World)
- Save New World as SimpleEnvironment.wrl (menu File - Save As...)
- Add a new Terrain Object (menu Objects - Add Object and select Terrain)
- Specify bumpiness as you desire (Go with the defaults if unsure)
- Move this down a little to make room for next item
- Build a tree from primitives (you could load an existing object but lets build a basic one for now)
- Add a Sphere - Objects - Add Object
- Move it up a little
- Add a Cylinder - Objects - Add Object
- Resize cylinder to be tall and thin (eg. like a tree trunk 0.3, 0.3, 0.3) - select and use Objects - Resize Object
- Now place the sphere on top of the cylinder
- When they are together Group them - use Grouping - Permanently Group Selected Items
- Move the Terrain back up so that the tree is sitting on the terrain
- Now we have a very simple park with a tree
- Save the World
- Lets add a Closer Camera
- Add a new Camera (call it Tree) - use menu Camera - Add Camera
- Now drag the eyeball to be close (using 4 view makes this easier) in to the tree so that it fills the view (note: if you don't have a view for this camera up get one- use menu Views - Add View and choose "Tree" camera)
- Save the World & Preview it (the browser should enable you to view the two differing camera perspectives, check these)
- Lets Add some lighting
- Add a new Positional Light - use Menu Lights - Add Light and choose Positional Light
- You will see the small white star appear above the centre of the world marker (if you cannot try menu Lights - Show Lights and if still not visible it is possible that the light is under/inside your tree object so try moving the tree to find it)
- Select the star (this is the lights representation) and use menu Lights - Edit Attributes
- Make the light Red in color
- Now you can move the light around and see the effect it has on the environment around it
- Try to place it slightly above and to the right of the tree (so that it casts a red light onto the tree)
- Save the World & Preview
- Lets add some interaction
- Firstly get the ID for the positional (red) light -
- Select it then use menu Lights Get Light Attributes then get the ID from the title bar.
- Now select the Tree and bring up its attributes
- Click the Proximity button in the Interactions section (lower left quarter)
- In the InRange event set the Pre-Defined action to be "Linked Light- Rainbow Cycle" (this will make our light steadily change colour, but only while the user is within its range)
- Set the Linked Light ID: field to be the ID we obtained earlier
- OK that action dialog
- Set the objects attributes
- Save the World and Preview (you will find that the default view is out of range and the light doesn't cycle through the colors, however if you go to the Tree view (or move into range via another method) the color cycling should happen).
- Lets add some sound
- Select the Tree and bring up its Attributes dialog
- In the sound section in the bottom right click the Add Sound to object checkbox
- In the file selector choose the sound file you wish to use (various formats may be supported it is dependant on your browsers VRMLplugin). For example use:
- VRMLmagic/Sounds/BirdSong
- Click the Play button to check its the sound you want
- Set the range and looping values (eg. loop on for continuous play and range to default)
- Set the objects Attributes (OK the dialog)
- Save the World & Preview (as you approach the tree the sound should get stronger and weaken as you move away)
At this point you've built the basics, now try filling out this environment with objects, lights and sounds as you desire, make it along the lines of a personal homepage (you can use action to link to other URLS). Below are some tips for achieving this quickly:
- Clone Out Trees/Objects, you can select an object or light (for example the tree) and use the menu Edit - Clone Selected Items this will give an exact copy of the item overlaying the current one, so simply move it to see both copies. Use this to quickly turn your tree into a forrest.
- By making minor changes to the cloned items you can vary the environment (eg. resize the top of the tree to make each tree slightly different, or use a cone instead of a sphere for a pine-tree type effect.
- To add detail you can load existing objects (see VRMLmagic/Objects for examples) these are a good way of enriching the space
When you have it finished Save the World and Preview it in the webbrowsers.
|
User Manual |
|
